Wednesday, December 16, 2015

The power of Google docs

Google is my favorite search engine and it never amazing me as how powerfully and clever it is despite being younger than me!!!! hahaha!!!!.

I remember  I commented on Facebook post of our one of my friends who was doing survey using email address ms word and I introduce to him to start using Google survey/form which is more powerfully and secure, you can access it here.

Since then Google never fail to amazing me as it is more than just a search engine, I used to know about google docs since when i was in college, but i never know how powerfully it is until a while ago, and i think i will be worth if i share my experience on google docs.

It normal for most Internet users to search for different template for their daily reports, people search for project proposal,resumes, sample letters, news letter, budget , easy report templates etc without knowing all that and more are available via Google docs, all you need is to have is Google account (Gmail) which is freely available, if you don't have google email address yet you can register using this link.

When done registering, login on your Gmail account and open a new tap then write docs.google.com to access Google docs as seen below,


Google docs are divided into 3 main parts.

  • Documents (docs)
  • Speedsheets (sheets)
  • Slides


To navigate on these 3 docs section, click on Docs word on left part of your browser as below


Docs
On document section, there are lot of templates you can use which are divided into Resumes, letters, Education and Work, see below,


Sheets
Also there different speed sheets docs you can use where they are divided into Personal, Work and Education.

Slides
The slides also are grouped in terms of Education, work and personal.

Until you start using some of the templates you will never know how powerfully it is, the good this about it after editing your docs you can save it online and access it every where but one limitation is you will need Internet to access your docs.

I wrote this to share with those who don't know how Google docs can help them to do their daily works, from students, professionals to business persons all can enjoy advantages and rich features Google docs.

Hope it help someone, if you like the post please drop a comment.


Friday, November 13, 2015

Email notification scheduling scripts on FreeBSD

Scripting is the best tool for any system administration,I had a system which is used to send notification email to clients, but we need these notification to be sent only on specific time, shell scripts help me to fully fill my needs by very few lines. I decided to share this script for any one wishing to schedule email sending on his system, my system use sendmail mail system and run on FreeBSD 7 operating system.

To achieve this I decided to design two scripts working as follows

a. Script one is used to stop the mail system at specific time.
b. Second script clean queued and deferred emails when the email system is down and start the email system.
c. Schedule the two scripts using the cron job to run on different time.

Below are steps for creating the scripts


a. Scripts 1

Change to root user and migrate to root directory, to create the scripts

sudo su
cd /root/ 

i. Create the file

vi stopsendmail.sh 

ii. Copy and paste the content below on created file

#!/bin/sh
/etc/rc.d/sendmail stop

And save the file. This script only stop sendmail mail system so that no any email will be sent.

iii. Make the script executable

chmod a+x stopsendmail.sh

b. Scripts 2

This second script clean the emails on the queue and any deffered email sent when mail system was done, and finally start mail system.

i. Creating the file

vi startsendmail.sh

ii. Copy and paste the content below on created file

#!/bin/sh
rm -rf /var/spool/mqueue/*
rm -rf /var/spool/clientmqueue/*
/etc/rc.d/sendmail start

iii. Make the script executable

chmod a+x startsendmail.sh

c. Create cron job to run the two scripts

Run the command below to open the cron file.

crontab -e

Copy and paste the following

# This Script stop the mail service at 17:45 Everyday
45 17 * * * /root/stopsendmail.sh
# This script start the mail service every 08:05 Evertday
05 8 * * * /root/startsendmail.sh

Your done, these two simple scripts will disable email system at one time and active it at the other time. If your using another system the commands and path may change a bit but semantics will be the same.


Hope it helps someone, if you face any challenge implementing the scripts drop the comment I will be happy to help.


Happy scripting and automation.


Friday, October 30, 2015

TheHarvester Linux Information gathering Tool

Ever you come in the situation where you want to send email to users of certain domain but you can't find any valid email addresses? theHarvester information gathering tool can help you.
theHarvester is a tool for gathering e-mail accounts, sub-domain names, virtual hosts, open ports/ banners, and employee names from different public sources (search engines, pgp key servers).
The sources supported are:

Google – emails, subdomains/hostnames
Google profiles – Employee names
Bing search – emails, subdomains/hostnames, virtual hosts
Pgp servers – emails, subdomains/hostnames
LinkedIn – Employee names
Exalead – emails, subdomain/hostnames

To get started, if theHarvester is not available in your Linux distribution, go and download it from here or check the latest version from here.

Migrate to download directory and extract the file

➜  ~   cd /home/james/Downloads
➜  ~  tar -xvzf  theHarvester-2.2a.tar.gz

Migrate to extracted directory and provide execute permission to the theHarvester.py

➜  ~   cd theHarvester-2.2a/
➜  ~  chmod 755 theHarvester.py


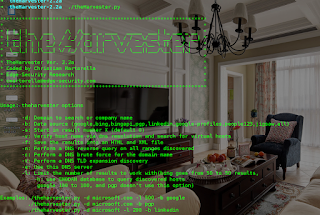
After getting in to that, simply run ./theHarvester.py , it will display version and other option that can be used with this tool with detailed description as seen on the diagram below,


To use the tool, use the following syntax

➜  ~ ./theHarvester.py -d [domainname] -l 300 -b [search engine name]

Example;
-The command below will search all email addresses, sub-domains,, virtual hosts found any where in google.

➜  ~ ./theHarvester.py -d facebook.com -l 300 -b google  

-The command below will search email address, sub-domains, virtual hosts etc of microsoft.com domain found in most search engines.

➜  ~ ./theHarvester.py -d microsoft.com -l 300 -b all 

If you are using KaliLinux, an Advanced Penetration Testing Linux distribution used for Penetration Testing, Ethical Hacking and network security assessments the tool comes pre-installed.


This tool is designed to help the penetration tester on an earlier stage; it is an effective, simple and easy to use, so don't abuse it, if you use it for hacking, hack ethically.


Enjoy!!

Monday, October 12, 2015

Bridging KVM guest machines

Kernel-based Virtual Machine (KVM) is a virtualization infrastructure for the Linux kernel that turns it into a hypervisor.Am using KVM to run virtual machines on my server, an alternative of kvm is virtualbox (which most of people are familiar with). When installing guest machines on host machine running kvm by default are assigned 192.168.122.0/0 IP address which is virtual address which are accessible only within the host machine, but not outside.
In this lab am going to show you how to bridge guest machines on kvm where will be accessible outside their host machine.This is archived by bridging them on host machine Ethernet interface and will be receiving dhcp from the router where the host machine is connected. Now lets start:

a. Start the kvm virtual manager

➜  ~   sudo virt-manager 


When booting one of my guest machine, by default it was assigned 192.168.122.122 ip address, see


Now lets configure it, so that will be receiving IP from dhcp server from the router.

b. Host machine configuration

Open host machine terminal and create the virtual bridge interface and add your physical on it, as below

➜  ~  sudo vim /etc/network/interfaces

The file should look as below

# interfaces(5) file used by ifup(8) and ifdown(8)

# Include files from /etc/network/interfaces.d:

source-directory /etc/network/interfaces.d


##########Bridge start#####

auto lo

iface lo inet loopback

auto eth0

iface eth0 inet manual

        up ifconfig $IFACE 0.0.0.0 up

        down ifconfig $IFACE down

auto br0
iface br0 inet static
bridge_ports eth0
bridge_fd 9
bridge_hello 2
bridge_maxage 12
address 192.168.0.100
netmask 255.255.255.0
network 192.168.0.0
broadcast 192.168.0.255
gateway 192.168.0.1
dns-nameservers 8.8.8.8
############Bridge end#######

Where i created an virtual interface named br0 and assigned it one of static ip in the range of my LAN ip.

Then, restart your network service

 ➜  ~  sudo /etc/init.d/networking restart

Note:
I have noticed some cases where restarting the network services is not taking effect, so you will have to restart the whole host machine.

So restart the host machine.

➜  ~  sudo reboot

c. Guest machine configuration
When the host machines comes up, start the virtual machine manager and go to specific guest machine where you want to bride it, Go to Edit ,Virtual Machine Details,Details and then click your virtual interface, as seen below


On source device select Specify shared device name and on bridge name type br0 and then save, as seen below


Your done, restart your guest machine and see if it will receive IP via dhcp.


See, it receive 192.168.0. 10 which is my dhcp range.

Hope it help someone.

Thursday, October 8, 2015

How to connect devices running on GNS3 to Internet in Ubuntu/Deepin

Hello everyone, you may came in a situation where you will need to connect devices running on visualization environment like GNS3 to Internet, here are steps.

i. Launch gns3 on command line
➜  ~  sudo gns3

ii. Add devices
For this lab, am going to use one router Cisco router 7200 and Cloud which will be connecting gns3 devices to Internet via my laptop which is connected to Internet using Ethernet cable connected to router .


iii. Cabling and bridging Cloud to the to my Ethernet interface.

Right-click on Cloud and select configure, then add etho (which is interface of my laptop as generic interface of the cloud) and then Appy and save.


Now connect interface of the router to this generic interface of the cloud.
Now power on the router for further configuration.

iv. Router Configuration
Now login to the router for configuration

➜  ~  telnet 127.0.0.1 2001
Trying 127.0.0.1...
Connected to 127.0.0.1.
Escape character is '^]'.
Connected to Dynamips VM "R1" (ID 1, type c7200) - Console port
Press ENTER to get the prompt.
ROMMON emulation microcode.

 a. Configure interface
Configure the interface to obtain IP address via dhcp of my public router (you may assign static IP also if you prefer).


R1#show ip interface brief Interface              IP-Address      OK? Method Status                Protocol
FastEthernet0/0        unassigned      YES unset  administratively down down  
R1#
R1#config tEnter configuration commands, one per line.  End with CNTL/Z.
R1(config)#interface fastEthernet 0/0R1(config-if)#ip address dhcp
R1(config-if)#no shutdown
R1(config-if)#
R1(config-if)#

*Oct  8 13:06:28.963: %LINK-3-UPDOWN: Interface FastEthernet0/0, changed state to up
*Oct  8 13:06:29.963: %LINEPROTO-5-UPDOWN: Line protocol on Interface FastEthernet0/0, changed state to up
R1(config-if)#
*Oct  8 13:06:37.907: %DHCP-6-ADDRESS_ASSIGN: Interface FastEthernet0/0 assigned DHCP address 192.168.0.17, mask 255.255.255.0, hostname R1

R1(config-if)#
As you can see the interface is assigned 192.168.0.17 IP from the router dhcp

b. Configure default gateway
R1(config-if)#exit
R1(config)#ip route 0.0.0.0 0.0.0.0 192.168.0.1


Now you are able to access the internet from the router

R1#ping 8.8.8.8 
Type escape sequence to abort.
Sending 5, 100-byte ICMP Echos to 8.8.8.8, timeout is 2 seconds:
!!!!!
Success rate is 100 percent (5/5), round-trip min/avg/max = 160/169/196 ms
R1#
c. Further config to enable users to login to the router remotely, configure passwords and also dns configuration.

Dns configuration

R1(config)#ip domain lookup
R1(config)#ip name-server 8.8.8.8 8.8.4.4

Configure password to allow remote login

R1(config)#line console 0
R1(config-line)#transport preferred none
R1(config)#line vty 0 4
R1(config-line)#transport preferred none 
R1(config)#username admin secret admin@2015
R1(config)#enable secret admin@2015
R1(config)#service password-encryption 
R1(config)#aaa new-model
R1(config)#aaa authentication login default local
R1(config)#aaa authentication enable default enable
      R1(config)#exit
      R1#wr

Ping google.com to test DNS

R1#ping google.com
Translating "google.com"...domain server (192.168.0.1) [OK]
Type escape sequence to abort.
Sending 5, 100-byte ICMP Echos to 41.220.141.187, timeout is 2 seconds:
!!!!!
Success rate is 100 percent (5/5), round-trip min/avg/max = 8/16/28 ms
R1#


Now your good, the router is online, and anyone within your network can login.

Enjoy!!!!!.


Thursday, October 1, 2015

Smokeping Configuration in Ubuntu 14.04

SmokePing is a deluxe latency measurement tool. It can measure, store and display latency, latency distribution and packet loss. SmokePing uses RRDtool to maintain a longterm data-store and to draw pretty graphs, giving up to the minute information on the state of each network connection. In this lab am going to show to configure smokeping to monitor latency for your network. Below are steps;


i. Prerequisite
This installation will require web service to be installed, for me am going to use Apache,but also it will need mail service for sending the email am going to use sendmail, run the following command to install web and mail service

$ sudo apt-get update
$ sudo apt-get install apache2
$ sudo apt-get install sendmail


ii. Install Smokeping

$ sudo -s
#
# apt-get install smokeping

For Ubuntu 14.04: you need to install a symlink to the apache2 config

# ln -s /etc/smokeping/apache2.conf /etc/apache2/conf-available/smokeping.conf
# a2enconf smokeping

Also, the CGI module needs to be enabled in Apache:
# a2enmod cgi

Finally, reload the Apache configuration:
# service apache2 reload

Then point your web browser at
http://X.X.X.X/smokeping/smokeping.cgi

where X.X.X.X is your server IP


iii. Initial Configuration

# cd /etc/smokeping/config.d
# ls -l
Output:
total 40K
drwxr-xr-x 2 root root 4.0K Oct  1 13:12 .
drwxr-xr-x 3 root root 4.0K Oct  1 13:12 ..
-rw-r--r-- 1 root root  177 Jan 28  2014 Alerts
-rw-r--r-- 1 root root  237 Jan 28  2014 Database
-rw-r--r-- 1 root root  489 Jan 28  2014 General
-rw-r--r-- 1 root root  225 Jan 28  2014 pathnames
-rw-r--r-- 1 root root  876 Jan 28  2014 Presentation
-rw-r--r-- 1 root root   50 Jan 28  2014 Probes
-rw-r--r-- 1 root root  147 Jan 28  2014 Slaves
-rw-r--r-- 1 root root  380 Jan 28  2014 Targets

The files that you'll need to change, at a minimum, are:
-Alerts
-General
-Probes
-Targets

a. Now open the General file with your favoirite editor (note the first capital letter)

# vim General

Change the following lines;

owner    = NOC
contact  = sysadmin@localhost
mailhost = localhost
cgiurl   = http://localhost/smokeping.cgi
# specify this to get syslog logging
syslogfacility = local5

Save the file and exit. Now let's restart the Smokeping service to verify that no mistakes have been made before going any further:

# service smokeping restart


b. Now open the Alerts file (note the first capital letter)
# vi Alerts
 
Change the following lines:

to = root@localhost
from = smokeping-alert@localhost

Save the file and exit. Restart Smokeping:

# service smokeping reload

Note: When you do some changes there is not need of restarting smokeping, just reload it for it to see configuration.


iv. Configuring monitoring of devices
For device configuration, most of configuration is done on
/etc/smokeping/config.d/Targets file.


As an example am going to configure some few devices where am going to have two groups Local devices and Public Servers,

# vi /etc/smokeping/config.d/Targets

Add the following to creates two groups:


+ LocalDevices
menu = LocalDevices
title = Local Network Devices

+ PublicServers
menu = PublicServers
title = PublicServers


Then add devices on those two groups :

+ LocalDevices
menu = LocalDevices
title = Local Network Devices

++MyGateway
menu = Gateway
title = Gateway
host = 192.168.0.1

++PrintServer
menu = PServer
title = PServer
host = 192.168.0.41

+ PublicServers
menu = PublicServers
title = PublicServers

++Google
menu = Google
title = Google
host = google.com

++Yahoo
menu = Yahoo
title = Yahoo
host = yahoo.com

++Facebook
menu = Facebook
title = Facebook
host = facebook.com


Finally the file will look like below:


*** Targets ***

probe = FPing

menu = Top
title = Network Latency Grapher
remark = Welcome to the SmokePing website of JARASYOLA Company. \
         Here you will learn all about the latency of our network.

+ Local
menu = Local
title = Local Network
#parents = owner:/Test/James location:/


#************************
# Local device monitoring
#************************

++ LocalMachine

menu = Local Machine
title = NOCServer
host = localhost
#alerts = someloss

+ LocalDevices
menu = LocalDevices
title = Local Network Devices

++MyGateway
menu = Gateway
title = Gateway
host = 192.168.0.1

++PrintServer
menu = PServer
title = PServer
host = 192.168.0.41


#**************************
#Public Server Monitoring
#**************************

+ PublicServers
menu = PublicServers
title = PublicServers

++Google
menu = Google
title = Google
host = google.com

++Yahoo
menu = Yahoo
title = Yahoo
host = yahoo.com

++Facebook
menu = Facebook
title = Facebook
host = facebook.com


OK. Let's see if we can get Smokeping to stop and start with the changes we have made, so far. Save and exit from the Targets file. Now try doing:

# service smokeping reload

If you see error messages, then read them closely and try to correct the problem in the Targets file. In addition, Smokeping is now sending log message to the file /var/log/syslog. You can view what Smokeping is saying by typing:

# tail /var/log/syslog

If you want to see all smokeping related messages in the file /var/log/syslog you can do this:

# grep smokeping /var/log/syslog

If there are no errors you can view the results of your changes by going to:

http://X.X.X.X/smokeping/smokeping.cgi

where X.X.X.X is your server IP


Your graph will look good as below;


From there you can add more devices and monitor their latency, i will explain more advanced features of smokeping on part two of this lab.

Happy monitoring.!!!


Monday, September 21, 2015

Configuring sms gateway with gammu and Kalkun on Ubuntu 14.04

Hello everyone, in this lab am going to show you how to install and configure sms gateway using gammu and Kalkun. An SMS gateway allows a computer to send or receive Short Message Service (SMS) transmissions to or from a telecommunications network.

Lab requirements
Hardware:
-A computer installed with Operating system, you can install windows, Mac or Linux operating systems, am using Ubuntu 14.04
--Modem with is supported by gammu, see supported modems here.Am using zte MF 190 in my lab.

Software:
-Gammu
    An open source program for communicating with mobile phones.It is command line sms gateway utility which allows to use all libGammu features.

-Kalkun
  Kalkun is open source web-based SMS (Short Message Service) management, it use gammu-smsd (part of gammu family) as SMS gateway engine to deliver and retrieve messages from your phone/modem.


Procedures
The lab consist two main steps
-Gammu installation
-Kalkun installation


********************
1. Gammu installation
********************

Prepare your machine
 As this is new installed Linux server, you should run the following command to prepare your server for gammu installation

sudo apt-get  update
sudo apt-get  upgrade

Install Gammu
sudo apt-get install gammu gammu-smsd

Now connect you modem and check is it is detected by running the following command

dmesg | grep tty

Output
sudo dmesg | grep tty
[    0.000000] console [tty0] enabled
[    0.827573] 00:04: ttyS0 at I/O 0x3f8 (irq = 4, base_baud = 115200) is a 16550A
[  203.063947] usb 1-1: GSM modem (1-port) converter now attached to ttyUSB0
[  203.064281] usb 1-1: GSM modem (1-port) converter now attached to ttyUSB1
[  203.064416] usb 1-1: GSM modem (1-port) converter now attached to ttyUSB2

Now configure gammu, create gammrc file and add the the following

sudo vim /root/.gammurc

The file should look like

[gammu]

port = /dev/ttyUSB2
model =
connection=at115200
synchronizetime = yes
logfile = /var/log/smsdlog
logformat = nothing
use_locking =
gammuloc =

Note:
port: /dev/ttyUSB* (depends on your usb modem attached port)

Test the connection between gammu and modem by running one of the following command

a. get modem identify

sudo gammu --identify

Device               : /dev/ttyUSB2
Manufacturer         : ZTE CORPORATION
Model                : unknown (MF190)
Firmware             : BD_MF190V1.0.0B24
IMEI                 : 865720018986973
SIM IMSI             : 640045000066980

b. Send a test sms

$ sudo su
# echo "This is just a test sms" | gammu --sendsms TEXT +25571588XXXX

If you want break, press Ctrl+C...
Sending SMS 1/1....waiting for network answer..OK, message reference=16


If everything is working fine and you are able to send sms via command move to step 2 now


**********************
2. Kalkun installation
**********************

-Since Kalkun is web based sms management service, we will install LAMP (apache as website, mysql database and php) as pre-requisity

To install LAMP,use the following command

sudo apt-get install lamp-server^

or

sudo tasksel

Then select [ * ] LAMP Server, It will install all package that needed for LAMP Stack

Now configure your database

a. Create database for sms, am going to call it sms

mysql -u root -p
create database sms;


b. Import data structure for gammu into sms database

#cd /usr/share/doc/gammu/examples/sql
# ls
mysql.sql.gz  pgsql.sql.gz  sqlite.sql.gz

# gunzip mysql.sql.gz
# ls
mysql.sql  pgsql.sql.gz  sqlite.sql.gz

# mysql -u root -p sms < mysql.sql

Check if the schema is imported

# mysql -u root -p

Enter password:
Welcome to the MySQL monitor.  Commands end with ; or \g.
Your MySQL connection id is 44
Server version: 5.5.44-0ubuntu0.14.04.1 (Ubuntu)

Copyright (c) 2000, 2015, Oracle and/or its affiliates. All rights reserved.

Oracle is a registered trademark of Oracle Corporation and/or its
affiliates. Other names may be trademarks of their respective
owners.

Type 'help;' or '\h' for help. Type '\c' to clear the current input statement.

mysql> show databases;

+--------------------+
| Database           |
+--------------------+
| information_schema |
| mysql              |
| performance_schema |
| sms                |
+--------------------+
4 rows in set (0.00 sec)

mysql>
mysql> use sms

Reading table information for completion of table and column names
You can turn off this feature to get a quicker startup with -A

Database changed

mysql> show tables;
 
+------------------+
| Tables_in_sms    |
+------------------+
| daemons          |
| gammu            |
| inbox            |
| outbox           |
| outbox_multipart |
| pbk              |
| pbk_groups       |
| phones           |
| sentitems        |
+------------------+
9 rows in set (0.00 sec)

mysql>


-Configure sms daemon

# vi /etc/gammu-smsdrc

The file should look something like

# Configuration file for Gammu SMS Daemon

# Gammu library configuration, see gammurc(5)
[gammu]
# Please configure this!
port = /dev/ttyUSB2
connection=at115200
# Debugging
#logformat = textall

# SMSD configuration, see gammu-smsdrc(5)
[smsd]
service = sql
logfile = /var/log/smsdlog
# Increase for debugging information
debuglevel = 0

# Paths where messages are stored
inboxpath = /var/spool/gammu/inbox/
outboxpath = /var/spool/gammu/outbox/
sentsmspath = /var/spool/gammu/sent/
errorsmspath = /var/spool/gammu/error/

#mysql connnection
Driver=native_mysql
User=root
Password= [Your mysql dababase password here]
PC=Localhost
Database=sms


Close and save the file.
-Run the service
# /etc/init.d/gammu-smsd start


-Check the service
#tail -f /var/log/smsdlog

b. Now download and install Kalkun
Download and extract the latest source code to your web root folder.

# cd /var/www/html
# mkdir sms
#cd sms

# wget http://downloads.sourceforge.net/project/kalkun/kalkun/0.7.1/kalkun_0.7.1.zip

#unzip kalkun_0.7.1.zip

open vim application/config/database.php and insert your mysql info, as below

$db['default']['hostname'] = "localhost";

// MySQL
$db['default']['username'] = "root";
$db['default']['password'] = "[your password here]";
$db['default']['database'] = "sms";
$db['default']['dbdriver'] = "mysql";


Change the ownership of sms folder to be accessible by apache user

#chown -R www-data:root /var/www/html/sms

Now restart apache

# /etc/init.d/apache2 restart

Now go to your browser http://<server IP>/sms/ and continue with installation, see below


When install is success rename or remove the install folder

Rename by the following command

# mv install/ install.bk

Finalize your installation by doing the following

a. -Open vim /etc/gammu-smsdrc and add the following line

runonreceive = /var/www/html/sms/scripts/daemon.sh

b.Edit the daemon file and its daemon.php in /scripts folder

#vim /var/www/html/sms/scripts/daemon.sh
and change to 

DAEMON=/var/www/html/sms/scripts/daemon.php

c. Add your url in your daemon.php file

#vim /var/www/html/sms/scripts/daemon.php

change the following line as below

$url = "http://localhost/sms";

Now your are good, stop and start smsd service

#/etc/init.d/gammu-smsd stop
#/etc/init.d/gammu-smsd start

Good to your browser on
http://<server ip>/sms

username is kalkun and password is kalkun.


Enjoy!!
Drop comments if you face any problems.


Monday, September 14, 2015

[Solved]-"Choose your keyboard layout" problem when upgrading to window 10 in Lenovo

I got lenovo g40 machine, i installed window 7 for the aim of upgrading it to window 10, when all initial check is done, and computer reboot to upgrade to window 10 it stuck on Choose your keyboard layout when all the keys are disable.
After several hours of troubleshooting including Googling i notices the problem affects most of Lenovo and HP computers when upgrading to window 10, below are solution for Lenovo.

-Switch off your computer
-Press fn + f2 which will take you to BIOS settings
-Navigate to Exit section, on Os Optimized Defaults choose Win8 64bit
-Then Load Defaults Settings
-Press Fn + F10 to save the configuration and restart.
-When restarting press Fn + F7 which will take you to next window when you will be required to choose between window 7 and window 7 setup, choose window 7 setup to start upgrade.

Your good to go! Problem solved.

Saturday, September 12, 2015

How to Install GNS 1.3.10 in Ubuntu 14.04/Deepin 2014.3

Graphical Network Simulator-3 (GNS3) is a software emulator for networks, launched in 2008. It allows the combination of virtual devices and real devices, and so can be used to simulate complex networks. It uses Dynamips emulation software to simulate Cisco IOS.Below are steps of how to install it on Ubuntu/Deepin from official documentation found here , which i modified a bit to match with new version GNS 1.3.10

#Run apt-get update
➜  ~  sudo apt-get update

# - Install GNS3 Python dependencies
➜  ~  sudo apt-get install python3-setuptools python3-pyqt4 python3-ws4py python3-netifaces python3-crypto


#- Install Dynmips dependencies
➜  ~  sudo apt-get install cmake libelf-dev uuid-dev libpcap-dev

# - Download and unzip GNS3 Linux source files here
Migrade to your download directory and unzip the file

➜ unzip GNS3-1.3.10.source.zip
Results:
Archive:  GNS3-1.3.10.source.zip
 extracting: dynamips-0.2.14.zip  
 extracting: iouyap-0.95.zip      
 extracting: ubridge-0.9.0.zip    
 extracting: vpcs-0.6.1.zip        
 extracting: gns3-server-1.3.10.zip
 extracting: gns3-gui-1.3.10.zip

# - Build and Install Dynamips
➜  ~ unzip dynamips-0.2.14.zip
➜  ~ cd dynamips-0.2.14
➜  ~ mkdir build
➜  ~ cd build
➜  ~ cmake ..
➜  ~ make
➜  ~ sudo make install
➜  ~ sudo setcap cap_net_admin,cap_net_raw=ep /usr/local/bin/dynamips
➜  ~ cd ../..

# - Install GNS3 Server
➜ ~ unzip gns3-server-1.3.10.zip
➜ ~ cd gns3-server-1.3.10
➜ ~ sudo python3 setup.py install
➜ ~ cd ..

# - Install GNS3 GUI
➜ ~ unzip gns3-gui-1.3.10.zip
➜ ~ cd gns3-gui-1.3.10
➜ ~ sudo python3 setup.py install
➜ ~ cd ..

# - Install IOU dependencies
➜ ~ sudo apt-get install libssl1.0.0:i386
➜ ~ sudo ln -s /lib/i386-linux-gnu/libcrypto.so.1.0.0 /lib/libcrypto.so.4
➜ ~ sudo apt-get install bison
➜ ~ sudo apt-get install flex
➜ ~ git clone http://github.com/ndevilla/iniparser.git
➜ ~ cd iniparser
➜ ~ make
➜ ~ cd ..
➜ ~ sudo cp libiniparser.* /usr/lib/
➜ ~ cd iniparser
➜ ~ sudo cp libiniparser.* /usr/lib/
➜ ~ sudo cp src/iniparser.h /usr/local/include
➜ ~ sudo cp src/dictionary.h /usr/local/include
➜ ~ cd ..

# - Install GNS3 IOUYAP app (provides network support for IOU)
➜ ~ unzip iouyap-0.95.zip
➜ ~ cd iouyap-0.95
➜ ~ sudo make install
➜ ~ sudo cp iouyap /usr/local/bin
➜ ~ cd ..

# - Install VPCS
➜ ~ unzip vpcs-0.6.1.zip
➜ ~ cd vpcs-0.6.1/src
➜ ~./mk.sh
➜ ~ sudo cp vpcs /usr/local/bin
➜ ~ cd ../..

# - Install VirtualBox
➜ ~ sudo apt-get install virtualbox

# - Install Wireshark
➜ ~ sudo apt-get install wireshark

# - Install QEMU - method 1
$ sudo apt-get install qemu
# - Install QEMU - method 2 (x86 arch. only)
$ sudo apt-get install qemu-system-x86
$ sudo apt-get install qemu-utils

# - Install cpulimit
$ sudo apt-get install cpulimit

# - Start GNS3
➜ ~ gns3

Note:
Don't include ➜ ~ when copying the command as that is Deepin terminal prompt.


Enjoy!

Sunday, September 6, 2015

How to free space in SSD on window 7


After installation of window 7 in computer with SSD and high RAM you may notice high usage of disk space than normal.This happens to me when i was installing window 7 on 100GB SSD drive with 16GB of RAM, i noticed installation took almost 40GB which is not normal at all for window 7, below is how i did to restore my space.


This is how my C look after installation but before space recovery:

Decrease the size of page file/Virtual Memory
Window as in Linux it allocates part of your hard drive as page file or virtual memory for the aim of increasing the performance of your computer, but if you have more than 4 GB of RAM this is useless, for me it allocates 16 GB of my hard drive as virtual memory, so the best way is to minimize it to 1024 Mb to 512 Mb by following the steps below:

-Click the Start button, right click Computer and then click Properties
-In the left pane click Advanced system settings
-In the window that opens click the Settings button in the Performance group box and select the Advanced tab page.
-Click the Change button and select the drive where you page file currently is (by default C:)
Select Custom size and fill the initial and maximum size of your page file to be the same amount of space
512 MB /1024 MB is more than enough if you have more than 4 GB of RAM When ready click Set and then OK.


By doing that it free most of my hard drive space, see below after performing the step above and restart computer.


Check this link for other means of freezing some space in SSD.


Hope it helps someone, enjoy.

Tuesday, August 4, 2015

Solved!!! The problem of wifi disconnection in Dell Latitude 7450 (7000 Series) when using Ubuntu/Deepin Linux

Friend of mine bought dell latitude 7450 which came with window 8 Pro, but because the guy is in love with Linux he installed Deepin Linux (http://www.deepin.org/) a linux distro based on Ubuntu, soon after installation he started facing problem of wifi disconnection which was so bad as sometimes the wifi forgets the password so he was supposed to retype the password every time it disconnects.
We take as challenge, and starting working with on it, where we discovered that the computer come with Intel Wireless 7265 card which has problem of loading the wifi driver in Ubuntu and all Ubuntu derivative distros.
The solution is to reinstall the drivers manually, by following the below two simple steps.

1. Download the kernel driver from this link (https://www.kernel.org/pub/linux/kernel/projects/backports/stable/v3.18.1/backports-3.18.1-1.tar.xz), although the driver is based on kernel version 3.18 but it works well also for kernel 3.13 ,and save it to desktop, then run the following commands,

sudo apt-get install linux-headers-generic build-essential
cd ~/Desktop/backports-3.18.1-1
make defconfig-iwlwifi
make
sudo make install

2. Download the firmware from the following link (https://wireless.wiki.kernel.org/en/users/Drivers/iwlwifi#Firmware), from documentation they suggested to use -9 for kernel version 3.17 but because we have kernel version 3.13 we downloaded both -8,9 and 10, download them on Download folder and extract then run the following commands,

cd ~/Downloads/iwlwifi-7265-ucode-23.11.10.0
sudo mv iwlwifi*  /lib/firmware

cd ~/Downloads/iwlwifi-7265-ucode-25.228.9.0
sudo mv iwlwifi*  /lib/firmware

cd    ~/Downloads/iwlwifi-7265-ucode-22.24.8.0
sudo mv iwlwifi* /lib/firmware

sudo chmod 644 /lib/firmware/iwl*

Reboot your computer for the change to take effect.


Problem solved, Enjoy!


For more info, also check the following links
http://ubuntuforums.org/showthread.php?t=2261834
http://en.community.dell.com/support-forums/laptop/f/3518/t/19627199

Tuesday, July 28, 2015

Migrating Cacti from One Server to another (Ubuntu 12.04 to Ubuntu 14.04)

You may need to migrate cacti from one server to another due to one reason or another, i did this lab migration from ubuntu server 12.04 to 14.04, i use this HOW TO (http://lifein0and1.com/2008/05/15/migrating-cacti-from-one-server-to-another/), doing some few modification according to need. Below are steps

1. Install Cacti on the New Server
2. Turn Off Cacti at the Old Server
3. Migrate the Database
4. Copy the RRD Files as XML
5.Reconvert the XML back to RRD File
6. Activate the New Cacti


1.  Install Cacti on the New Server
a. Use the following link (http://www.unixmen.com/install-cacti-ubuntu-14-04/), after finishing installation on command line, don't go to browser until step 6 when activating the new cacti.

b. Turn-off the poller
Run the command

$ sudo vim /etc/cron.d/cacti

Disable the poller by putting the character ‘#’ in front of the crontab entry then save & quit


2. Turn Off Cacti at the Old Server
Run the command

$ sudo vim /etc/cron.d/cacti

Disable the poller by putting the character ‘#’ in front of the crontab entry then save & quit.


3. Migrate the Database
a. At the old server run the command

$ sudo mysqldump -u root  -p  cacti > ~/cacti.sql

When it asks for the password, enter the password for mysql database

b. SCP on the old data and grap the data and move it to new server.

c. On the server run the following
$ sudo mysql -u root -p cacti < ~/cacti.sql


4. Copy the RRD Files as XML
Do the following on the old server

a. Go to the directory
$ cd /var/lib/cacti/rra/

c. Run the script
$ sudo ls -1 *.rrd | awk '{print "rrdtool dump "$1" > "$1".xml"}' | sh -x

d. Tar and Gzip the XML files using the command
$ sudo tar -czvf ~/rrd.tgz *.rrd.xml


5.Reconvert the XML back to RRD File

a. SFTP into the old server and download the ‘rrd.tgz’ created in the step before

b. Move the file to the new directory
/var/lib/cacti/rra/

c. Untar the file
tar -xzvf rrd.tgz

d. Run the command
$ sudo ls -1 *.rrd.xml | sed 's/\.xml//' | awk '{print "rrdtool restore "$1".xml "$1}' | sh -x

e. Change ownership of all RRD files to www-data by running the command:
$ sudo chown www-data:www-data *.rrd


6. Activate the New Cacti

a. Visit the new site and set the mode to ‘Upgrade’
b. Reactivate the Poller

Run the command
$ sudo vi /etc/cron.d/cacti

Enable the poller by removing the character ‘#’ in front of the crontab entry then save & quit


Enjoy!

Monday, July 27, 2015

How to mount/connect usb drive in Linux server

If you want to copy something from/to the server from usb drive, your required to connect it or simply mounting the usb, below are steps

a. Connect the usb drive to the server

b. Check if it is connected by running the following command

  #fdisk -l

eg.

root@myserver:/home/admin# fdisk -l

Disk /dev/sda: 160.0 GB, 160041885696 bytes
255 heads, 63 sectors/track, 19457 cylinders, total 312581808 sectors
Units = sectors of 1 * 512 = 512 bytes
Sector size (logical/physical): 512 bytes / 512 bytes
I/O size (minimum/optimal): 512 bytes / 512 bytes
Disk identifier: 0x000cff3c

   Device Boot      Start         End      Blocks   Id  System
/dev/sda1   *        2048      499711      248832   83  Linux
/dev/sda2          501758   312580095   156039169    5  Extended
/dev/sda5          501760   312580095   156039168   8e  Linux LVM

Disk /dev/mapper/cpvirt--vg-root: 155.6 GB, 155604484096 bytes
255 heads, 63 sectors/track, 18917 cylinders, total 303915008 sectors
Units = sectors of 1 * 512 = 512 bytes
Sector size (logical/physical): 512 bytes / 512 bytes
I/O size (minimum/optimal): 512 bytes / 512 bytes
Disk identifier: 0x00000000

Disk /dev/mapper/cpvirt--vg-root doesn't contain a valid partition table

Disk /dev/mapper/cpvirt--vg-swap_1: 4177 MB, 4177526784 bytes
255 heads, 63 sectors/track, 507 cylinders, total 8159232 sectors
Units = sectors of 1 * 512 = 512 bytes
Sector size (logical/physical): 512 bytes / 512 bytes
I/O size (minimum/optimal): 512 bytes / 512 bytes
Disk identifier: 0x00000000

Disk /dev/mapper/cpvirt--vg-swap_1 doesn't contain a valid partition table
Note: sector size is 4096 (not 512)

Disk /dev/sdb: 3000.6 GB, 3000592982016 bytes
255 heads, 63 sectors/track, 45600 cylinders, total 732566646 sectors
Units = sectors of 1 * 4096 = 4096 bytes
Sector size (logical/physical): 4096 bytes / 4096 bytes
I/O size (minimum/optimal): 4096 bytes / 4096 bytes
Disk identifier: 0x000b061a

   Device Boot      Start         End      Blocks   Id  System
/dev/sdb1   *         256   732566591  2930265344   83  Linux


c. Create a new mount point/directory where the usb disk will be mounted

# mkdir /mnt/sdb1


d.  Mount /dev/sdb1 which is the location of our usb disk to the new created mount point

#mount -t ext4 /dev/sdb1 /mnt/sdb1

e. To make the change permanent edit /etc/ftab with the new mount point

# echo ''/dev/sdb1 /mnt/sdb1 ext4 defaults 0 0'' >> /etc/fstab


f. Mount all entries in /etc/fstab in not already mounted

# mount -a

g. Check if the usb drive is mounted

#mount | grep sdb1

h. The mounting is done, to access usb drive content, you may run the following command

# cd /mnt/sdb1


Enjoy!


Friday, July 17, 2015

How to repair filesystem in Linux after power failure

For some of the countries, its normal to have power fluctuations and you find your linux server goes down due to power failure, when it comes up, it good linux administration practice to repair incase there is any corrupted file system due to power failure, below is the command


$ sudo Shutdown -Fr now

Only that command will make your life good after power failure. Enjoy!

Sunday, July 12, 2015

Controlling user bandwidth by Firewall and Queues in Mikrotik Router

Heavy downloads and uploads has become problems in most of networks now days, as users are running different bandwidth hungry applications such as peer-to-peer, video downloads etc which lead to slow down of whole network because of only one single user or some few users who are doing heavy downloads/uploads.
This lab is going to show you how to limit all users to specific speed in three simple steps using firewall mangle rules and queues in mikrotik router, in this lab am going to limit all users at 1Mbps bandwidth speed, which means that will be maximum speed reached by each particular user in the network despite available bandwidth.

Below are steps

a.  Create a customized queue types with preferred speed for each individual user,

Command:

/queue types

add name="PCQ_Download" kind=pcq pcq-rate=1M pcq-limit=50 
     pcq-classifier=dst-address pcq-total-limit=2000 pcq-burst-rate=0 
     pcq-burst-threshold=0 pcq-burst-time=10s pcq-src-address-mask=32 
     pcq-dst-address-mask=32 pcq-src-address6-mask=64 pcq-dst-address6-mask=64 

add name="PCQ_Upload" kind=pcq pcq-rate=1M pcq-limit=50 
     pcq-classifier=dst-address pcq-total-limit=2000 pcq-burst-rate=0 
     pcq-burst-threshold=0 pcq-burst-time=10s pcq-src-address-mask=32 
     pcq-dst-address-mask=32 pcq-src-address6-mask=64 pcq-dst-address6-mask=6


By winbox or web config:

Go to Queues-Queue Types, and add , example below is for PCQ_Download


b. Mark all the packet, which is to be queued for specific speed

Command:

/ip firewall mangle
 add chain=prerouting action=mark-packet new-packet-mark=user_download 
     passthrough=yes in-interface=wlan1-gateway 

 add chain=prerouting action=mark-packet new-packet-mark=user_upload 
     passthrough=yes in-interface=ether1-local

Note am marking download packets from wan interface in which for my case is wireless interface because am using wireless radio as a router, also am marking upload from LAN interfaces in which from this lab is ether1-local

By winbox or web config:
Go to ip firewall mangle , and add, example below is for user dowload


c. Finally create a tree queue for limiting every individual user speed

Command:

/queue tree
  add name="UserDownload" parent=global packet-mark=user_download 
     limit-at=0 queue=PCQ_Download priority=8 max-limit=0 burst-limit=0 
     burst-threshold=0 burst-time=0s 

  add name="UserUpload" parent=global packet-mark=user_upload limit-at=0 
     queue=PCQ_Upload priority=8 max-limit=0 burst-limit=0 
     burst-threshold=0 burst-time=0

By winbox or web config:
Go to queue tree , and add, example below is for user dowload

You're done, below is the torch output before and after settings

Before:

Single user was able to reach 2.2Mbps


After:
All users are limited at 1Mbps as per our setting


Hope it help someone, drop me a comment, if you face difficulties implementing any of the step.

Cheers!

Saturday, July 11, 2015

Ubuntu 14.04 Lost Password recovery

There are cases when you forget the login password of your Linux machine, as this case which happens to my friend who is new to Linux, after installing the Linux server he didn't remember the password of the user he created during installation, so he was planning to re-install the server, there is no need for doing re-installation, just follow the following procedure to recover your password.


  1. Boot your system and choose Advanced Options for Ubuntu,


    2.   Then, choose Recovery mode,


   3. It will take you to different recovery mode options,

  4. From Recovery Menu Options, choose to Drop to root shell prompt


  5. It is going to drop you on shell prompt, you need to run the following         
      commands to change you password.

       i. First is to mount root file system
           # mount -rw -o remount /
  
       ii. In case you don't remember the user you created during installation, 
           check the created users in the system by running the following
            # ls  /home/

          Output may differ, according to the user created, for this case of mine,   there was only one user called silas

       iii. Change the password of the existed user
             # passwd silas

        iv. After changing the password your done, now reboot your system
              # reboot


Hope is going to help someone, Enjoy!